Anki-Slideshow: Publish Anki flashcards to the web
I’ve started putting all my medical school flashcards on this website using some Python and Ruby. Read how I did it below, or get the source code.
I’ve been using Anki to generate flashcards for just about every class in medical school since the second semester, and it’s been clutch for trying to memorize the insane amounts of material that we’re given. I’d say that Anki is almost perfect for medical students and the reasons why deserve a post all to themselves. This post, rather, is about something that I thought was missing from Anki—namely, publishing the content to the web—and how I wrote some code to fix it, all thanks to Anki being open source and extensible.
Most people think using open source software is an ideological consideration, but as a student, it can be just as much a practical benefit. Students are already reliant on so much software, from office programs to course management systems, much of it proprietary. It can be disastrous when those apps become unsupported, stop working on your new device, or worse, lose data. Imagine taking a semester’s worth of notes on a shiny new website or app that you tried because it was free or had some killer feature that you couldn’t resist. Then the company goes out of business, and the website shuts down. Or, your computer breaks, and the app doesn’t work on your new one. Maybe the company decides to disable support for exporting content unless you pay a huge fee. These situations are terrifying—especially if you have a test, much less a career licensing exam, right around the corner.
With Anki, not only is the desktop program free, but all notes are stored permanently on your own computer. Also, because it is open source, your data will always be retrievable, even if that means some tooling around with some Python libraries or firing up an SQLite console. It’s literally impossible for the developers to shut you out, and even if they tried, somebody could fork Anki and fix it. For these reasons, data in open source software is inherently much more future-proof than something like Microsoft Office. In case you didn’t know, Office still has no complete specifications for its legacy file formats, and probably never will. (And now it’s moving to the cloud with Office 365, where you will have even less control over preserving your content.)
As it turns out, Anki is exceptionally customizable. Since the desktop app is written in Python with bindings to Qt for the GUI, not only is it cross-platform, but it supports writing plugins as Python scripts, called “addons”. That means: no compiling, everything lives in one text file, and live objects can be debugged in a console. Sweet! You can do everything from GUI alterations to enhancing internal data structures or the scheduling algorithm. There are quite a few addons already available online.
That brings us to my problem: most kinds of content have a “natural” online destination for sharing: Flickr and Instagram for photos, YouTube for video, Slideshare for slide decks, and Scribd for office documents. Anki doesn’t really have anything in the same league. Yes, there’s AnkiWeb, but it’s designed to be used primarily as a sync backend. An account is required to do anything, it has less features than the desktop app, and the sharing functions are pretty limited. There are a few gems hidden in there for medical students, but in general it’s hard to find, share, and show off good Anki material.
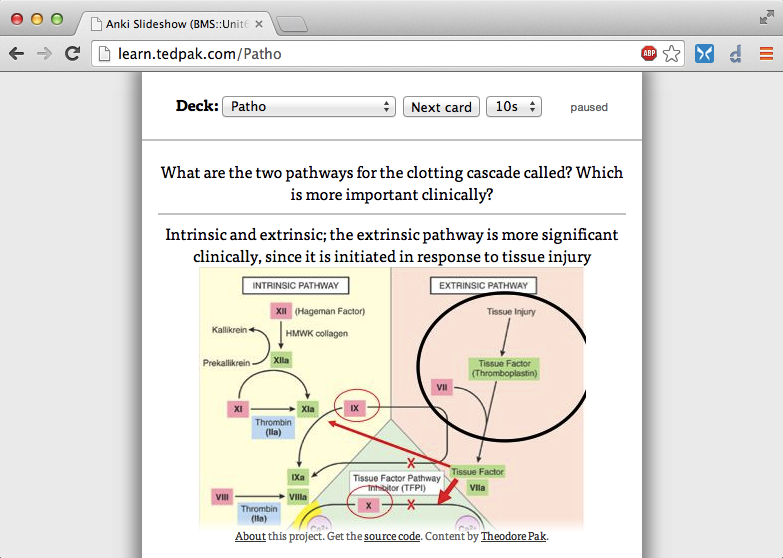
And so, I was struck with the idea of creating a way to do exactly this. I spend most of my time in lecture writing flashcards, and I don’t want them locked up on my computer forever. It would be nice to have them right here on this blog, not only for me so I can watch them when I’m bored, but so that others might do the same. Sometimes it’s nice to passively browse through content. Why watch cat videos when you can watch Pathology flashcards? (Har har.)
The vision was to create a menu item within Anki that you click, and then everything gets synced to the web server, which plays the cards like a slideshow. The Anki component fits entirely in one short Python script. There are only 5 functions, the key one being exportCardsToWeb(). In short, the mw.col object, which represents the current collection of Anki notes, is dumped into a JSON file holding the decks and the cards within them, rendered to HTML by the renderQA() method. Then, the whole mess is copied using rsync to a destination of your choice. Adding these functions into the Anki GUI is as easy as the following lines at the end of the script:
mw.form.menuTools.addSeparator()

action = QAction("Export Cards to Anki-Slideshow", mw)
mw.connect(action, SIGNAL("triggered()"), exportCardsToWeb)
mw.form.menuTools.addAction(action)

action = QAction("Change Sync Destination for Anki-Slideshow", mw)
mw.connect(action, SIGNAL("triggered()"), getSyncTarget)
mw.form.menuTools.addAction(action)
This throws an extra section with two items onto the end of the Tools menu of the main window. Clicking on these items runs the functions written at the beginning of the script.
It’s not that hard to serve data from a big JSON file with a web app. It’s a perfect use case for the lightweight Sinatra web framework. The entirety of the Ruby code written for this is 72 lines, with around 75 lines of HTML templating in ERB. There are more lines of Javascript (~150 + a few jQuery plugins) than server-side code. I wanted to serve this from a subdomain of this server (https://learn.tedpak.com) and have it look decent both on its own and as an embeddable widget. There are only three routes defined:
get "/" do
  redirect "/" + AnkiSlideshow.decks.keys.sample
end

get "/:image.jpg" do
  content_type "image/jpeg"
  send_file File.join(AnkiSlideshow.media_dir, params[:image] + ".jpg")
end

get "/:deck" do
  @title = @deck_name = params[:deck]
  deck = AnkiSlideshow.decks[params[:deck]]
  pass unless deck
  random_card_id = deck.sample && deck.sample.to_s
  if random_card_id then @card = AnkiSlideshow.cards[random_card_id]
  else @card = {"q" => NO_CARDS_MESSAGE, "a" => NO_CARDS_MESSAGE}; end
  erb :card
end
In short, this means that if you go to the bare domain, you’re redirected to a random deck; if you fetch a URL ending in “.jpg”, it grabs the picture (if there is one) and serves it. If the URL is anything else, it looks for a deck with that name and serves a random card from it.
The rest of the hard work is done by some jQuery in the interface. Once it is time to fetch a new card, a request is sent via AJAX to the same /:deck URL route, which provides the full HTML for a new random card. To avoid a distracting transition, the new card is parsed out of the HTML and inserted in the current page. If the user changed the deck they want to view, we can even gracefully update the URL in the address bar using the HTML5 History API. A lot of this is made straightforward by the jQuery .load() method, as can be seen in the excerpt below:
$("#next-card").load(href + " #card > *", function() {
  $('#card').fadeOut(fadeTime, function() {
    if (window.history && window.history.pushState
        && window.location.href != href) {
      window.history.pushState(null, null, href);
    }
    $('#card').empty().show().append($('#next-card > *'));
    $('#next').val('Turn over').unbind('click').click(flipCard);
    $('#timer').trigger('callback', flipCard);
    $('#timer').trigger('start', changeTime[0]).removeClass('transition');
    $('#card .front').addClass('solid').fadeIn();
    $.scrollTo('#card .front', fadeTime, {offset: {axis: 'y',
        top: -switcherHeight}});
    if ($('body').is('.hover')) { $('#timer').trigger('stop'); }
  });
});
That $.scrollTo() call provides a nice animated transition to the reverse side of the card in case it is off the edge of the screen, using the very nice scrollTo jQuery plugin.
Since I preferred the web app to run more like a passive slideshow than an active learning tool like the Anki apps (requiring you to click through the cards according to right or wrong answers), the bulk of the remaining JavaScript is dedicated to making the little timer widget in the upper right corner, which automatically flips cards unless you turn it off or pause it by hovering over the card. You can see how other code has to interact with the widget via those events triggered on $('#timer') in the previous excerpt. The spinning wheel is drawn via <canvas> but it would probably look even better as SVG.
To embed the web app into another page, an <iframe/> element with a src attribute pointing to one of the decks can be used. For example, this is how I can embed my Cardiovascular deck.
<iframe src="//learn.tedpak.com/Cardiovascular"
    width="480" height="400" frameborder="2"></iframe>
It produces the following, which I’ve highlighted with the frameborder="2" attribute so you can see where its edges are. But those can be turned off by setting frameborder="0".
And there you have it. Hopefully this inspires other projects that try to use Anki content in larger web apps, since it is a powerful tool that deserves more integration into so many other things. The code is on Github, and you can see the slideshow in action with my medical school decks on this site or as a standalone website. Some ideas I currently have for improving it are:
- A better front page for it that explains the UI and deck content before jumping into a deck
- Upgrading the timer drawing to SVG so it looks better on high-res screens
- Adding tag support, so you can filter by subtopic and by lecture (I tag in Anki by lecture number)
- Having the server remember your recent cards, so it tries not to repick them
Discuss this post on HN.